WIOL#3 – 2022 – South Seattle College- Training Opportunities
November 23, 2022 by John Brady
WIOL#3 Offered Training Package
Race Prep
Preview previous South Seattle College Races on COC’s RouteGadget
2022 Wednesday Evening Series Race
2017 SART Map (Round 5.2) and YouTube Video of Will Enger running on that Map. See if you can keep up with him as he runs by watching the video in split screen while looking at the map.
Play the video game Running Wild
Each of these links will take you to a computer simulation video game. The simple object is to click on the screen the route you would take to get to each checkpoint. However, if used as a visualization and route tool, you will see it can be much more useful. I challenge you to consider this as you do each of these levels. Do not click just to get it over with quickly, but rather ensure that each thing you click on is a fundamental stepping stone you want to see on or near your path. Don’t be so focused on shortest path either. Get the most out of your training. Do it twice: once with urgency and once with specificity. Then compare! Password for each course is COC
Sprint Thoughts:
- Is there a significant distance difference between running this way or that way? When the distances are similar, often a quick decision and execution of that decision are the most critical element. However, it is good practice to play games like Running Wild (links above) or the Route Choice Game to give you an idea exactly how much difference in distance one route is compared to the other. Did you know that if you average 10 min/k (which is a good average time for average competitors) that every 100m extra you run equals 1 minute of lost time? Even if you only go an extra 10m per leg too long, it can add up to a significant amount of time for the composite race.
- Entering and exiting controls without pause becomes a very important task in a sprint race. Often, beginners waste a very large amount of time. Some ways you can improve your flow:
- Get a control code sleeve. Wear it such that you can read it without needing to unfold your map. This will allow you to more rapidly ensure you know all you can know about the control location.
- Know the control codes by heart. They should be instantly recognizable.
- Get used to reading “Column G”. This column of the control codes tells you where the control is relative to the feature it is hung on. You always want to be on the same side of the feature as the control or you risk not seeing it, even from only a few feet away. So navigate to the side of the feature if you can.
- Control your speed. A thought-drill called the 1-2-1 drill is useful for being aware of the right amount of speed to build to. It works like this:
- Don’t move until you know the route to the first control. That is the first “1” in the 1-2-1. Move slowly. Slow enough to read the map.
- Find the next two things along your route you are looking for ( the “2” in the 1-2-1). First find the next thing, you are looking for, and start to add speed. Then peek ahead to the second thing you are looking for. Add more speed if you know the next two things. Always try and have the next two things you are looking for figured out. With that figured out, you can add high speed.
- Lastly, start looking ahead to the route to the next control (the last “1” in the 1-2-1). Knowing your entire route to the following control becomes very important in a sprint race because often decisions must be made as quickly as the first step coming out of the previous control. When you know 1-2-1 (next route, next two things you are looking for, and the subsequent route), you are in a low risk situation and should really be running full speed.
- As you start to lose some of the things you are trying to track, your speed should be adjusted.
- Learn about the following traps and tricks that are a bit unique to sprint maps and meets:
- Passable vs Unpassable becomes the main thought. Know what all the symbols for a sprint map mean. Particularly:
- Canopies, Tunnels, Multi-Level runnable buildings
- Out of bounds (olive, dark green, pink hash marks, pink X’s)
- Be aware of “artificial barriers”. This is a new trend in sprint orienteering
- Passable walls and barriers vs impassable. Know the difference.
- Long legs often have early-in-the-leg decisions that must be made or risk making a major mistake.
- Quick legs can seemingly be easy, but often can serve to disorient you, and prevent you from working ahead. Beware the legs following quick, seemingly easy legs.
- Some route choices seem easy if you just consider the magenta line connecting the two checkpoints. However, often controls are placed inside an area with only one way in and out. In this circumstance, the route is effectively from the entrance of that area to the next checkpoint. The difference between these two can fool you into committing to a route that is not ideal.
- Cluttered map: Often checkpoints cross over each other. It is easy to get confused and go to the wrong one.
- Elevation is not typically a factor. However, if a sprint venue is on a hillside, then it is likely the course designer will add over vs around a hill as a route choice. Do map study to prepare yourself for this.
- Multiple controls: The separation between control for a sprint map is much smaller than that for a forest race. As such, it is likely you will see and be tempted to go to a control that is not yours. Be surer to check the numbers.
- Other people in close proximity: It is easy to be distracted or even pulled off in the wrong direction by watching another competitor. Do your own work.
- The compass is not that necessary. You might not even need it. That is okay. The goal is to go fast. If it slows you down, then dont even bother with it. There are many undeniable features in an urban sprint that will allow perfect orienting of your map without use of the compass.
- Always see the whole route, not just a direction. You will get trapped eventually if you do not evaluate the entire leg before you commit to a direction.
- Passable vs Unpassable becomes the main thought. Know what all the symbols for a sprint map mean. Particularly:
Pre-Race: Day of Meet
- Come by Coaches Corner to play around with some warmup drills or skills. Maps will be provided for you.
- Three drills will be available.
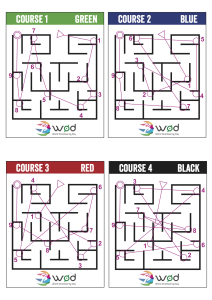
- Maze: Yes…a maze will be setup in the warmup area. Practice quick map reading and decision making. Keep your time and compare against your friends and teammates. Ask for help from a coach if needed. There will be 4 different courses to choose from. There is the “potential” for ePunch timing if I can figure out how to set it all up and run it by then. However, since I have never done that before, it might not happen and you will just have to time yourselves.
- Scale course.
- Jog around in the allowed warmup area. Bring the scale map. This map is in the same scale as your race map. As you jog around, take note of how fast you approach items on the map. As you make a few warmup laps, take note of how things look in real life and how many things you can and can not notice. When you approach the start line there should be no “scale-surprises.” This is a normal phenomenon when a race first starts where you misjudge distances until you get used to the map. Well, this drill the purpose is to do that before you race.
Post Race (1PM ReRuns): No Post Race Meetings Will Be Held.
Analysis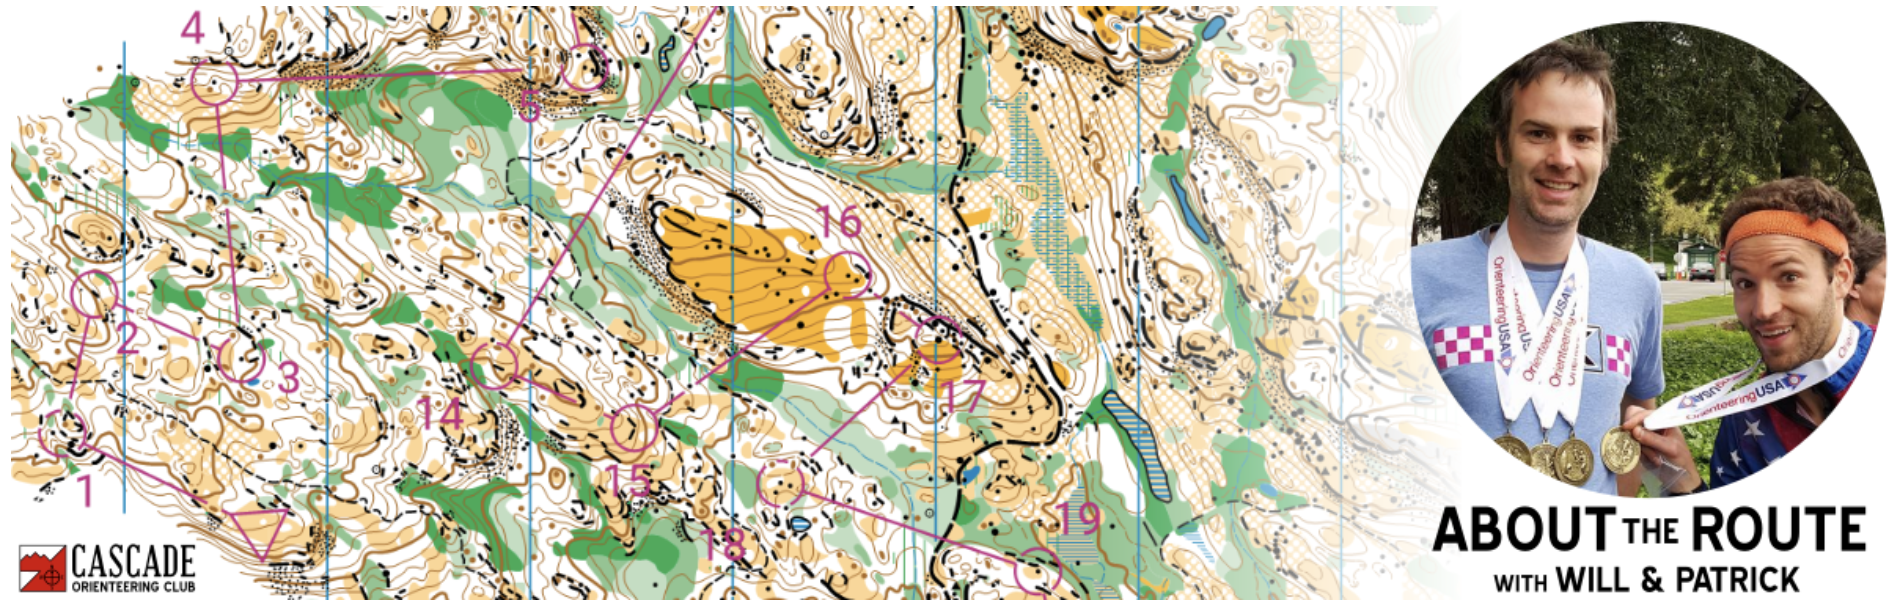
About the Route! This is a social conversation meant for all ages.
Dial in, chat, and discuss the course and different routes with 2 experts from COC as you all enjoy talking about the “what-if’s” of orienteering. “What if I just didn’t do something crazy here?” Event info here.